# 一、什么是 Redis Cluster
Redis 是在内存中保存数据的,而我们的电脑一般内存都不大,这也意味着 Redis 不适合存储大数据,适合存储大数据的是 Hadoop 生态系统的 Hbase 或者是 MogoDB 。Redis 更适合处理高并发,一台设备的存储能力是有限的但是多台设备协同合作,就可以内存增大很多倍,这时就需要集群。
Redis 集群搭建的方式有很多种,但从 redis 3.0 版本之后,支持 redis-cluster 集群,它是 Redis 官方提供的解决方案,Redis Cluster 采用的是 无中心架构 ,每个节点保存数据和整个集群状态,每个节点都和其他节点有所连接。Redis Cluster的基本原理可以从数据分片、数据迁移、集群通讯、故障检测以及故障转移等方面进行了解,其架构如下:
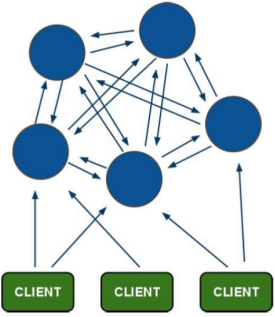
客户端与 redis 节点直连,不需要中间件 proxy 层,客户端不需要连接集群所有节点,连接集群汇中任何一个节点即可。所有的 redis 节点彼此互联(PING-PONG 机制),内部使用二进制协议优化传输速度和带宽。
# 二、分布式存储机制-槽
【1】Redis Cluster 在设计中没有使用一致性哈希(Consistency Hashing),而是使用数据分片(Sharding)引入哈希槽。
【2】Redis Cluster 把所有的节点映射到 [0-16383] slot 槽上,cluster 负责维护 node<->slot<->value 三者之间的关系。
【3】Redis 集群中内置了 16384 个哈希槽,当需要在 Redis 集群中放置一个 key-value 时,redis 先将 key 使用 CRC16 算法算出一个结果,然后把结果对 16384 求余数,这样每个 key 都会对应一个编号 0-16383 之间的哈希槽,redis 会根据节点数量大致均等的将哈希槽映射到不同的节点上。集群之间通过一种特殊的二进制协议交互集群信息。
TIP
例如,当有三个节点时,槽分布的值如下:
节点1: 0-5460
节点2: 5461-10921
节点3: 10922-16383
【4】Redis Cluster 允许用户强制把某个 key 挂在特定槽位上。通过在 key 字符串里面嵌入 tag 标记,这就可以强制 key 所挂的槽位等于 tag 所在的槽位。
【5】客户端为了可以直接定位某个具体的 key 所在的节点,需要缓存槽位相关信息,从而实现快速定位。同时因为客户端与服务端的槽位可能不一致,还需要纠正机制来实现槽位信息的校验调整。
【6】Redis Cluster 的每个节点会将集群的配置信息持久化到配置文件中,所以必须确保配置文件可写,而且尽量不要依靠人工修改配置文件。
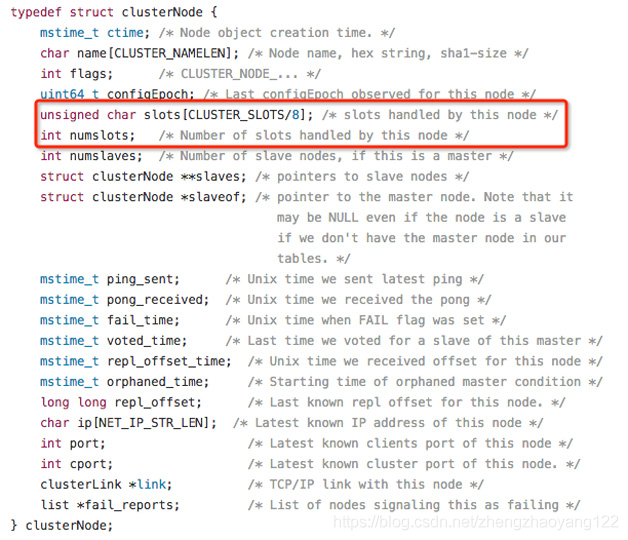
【7】ClusterNode 数据结构中的 slots和 numslots属性记录了节点负责处理哪些槽。其中,slot属性是一个二进制位数组(bitarray),其长度为16384/8=2048 Byte,共包含16384个二进制位。集群中的 Master节点用bit(0和1)来标识是否拥有某个槽。比如,对于编号为1的槽,Master只要判断序列第二位(索引从0开始)的值是不是1即可,时间复杂度为O(1)。

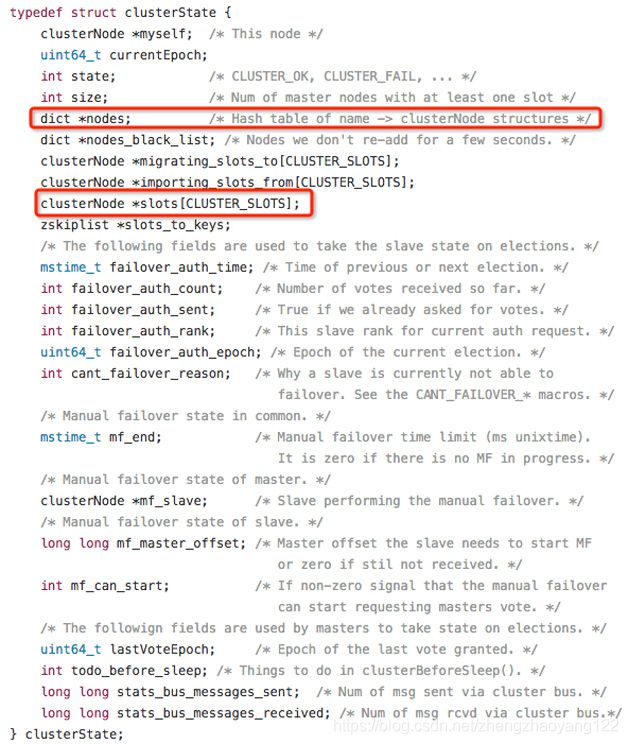
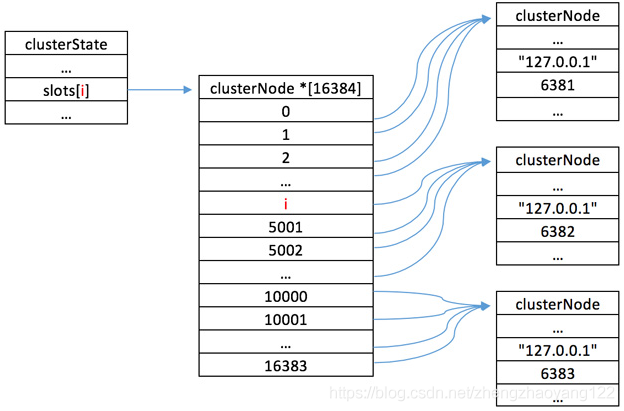
集群中所有槽的分配信息都保存在 ClusterState数据结构的 slots数组中,程序要检查槽是否已经被分配或者找出处理槽i的节点,只需要访问 clusterState.slots[i] 的值即可,复杂度也为O(1)。ClusterState数据结构如图所示。
【查找关系图】:
# 三、容错机制投票
【1】选举过程是集群中所有 master 节点参与,如果半数以上 master 节点与故障节点通信超过设置的(cluster-node-timeout),认为该节点故障,自动触发故障转移操作。故障节点的从节点自动升级为主节点。
【2】如果集群任意 master 挂掉,且当前 master 没有 slave。集群进入 fail 状态,也可以理解成集群的 slot 映射[0-16383]找不到对应的槽时进入 fail 状态。
# 四、搭建Redis-Cluster
准备工作: 准备六台 Redis 服务器,三台 Master 主机,三台 Slave 备机(我们因条件问题,下面六台服务器均出自一台计算机,只是端口不一致(从7001-7006))
【1】下载 Redis 的源码文件,进行解压(tar -zxvf redis-3.0.0.tar.gz),进入解码目录,对 C语言开发的 Redis 进行编译[make],编译完成后创建安装的目录(/usr/local/redis-cluster/redis-1 等),执行命令进行安装(make install PREFIX=/usr/local/redis-cluster/redis-1 等)
【2】复制配置文件,将 /redis-3.0.0/redis.conf 复制到 redis下的 bin目录下(cp redis.conf /usr/local/redis-cluster/redis-1/bin)
【3】修改六台服务器中的bin/redis.conf 配置文件,将配置集群字段前的注释去掉: # cluster-enabled yes 并修改端口(45行:port 7001)
【4】安装 Ruby 环境:
yum -y install ruby
yum -y install rubygems
2
【5】网上下载 redis-3.0.0.gem,执行 gem install redis-3.0.0.gem 安装。
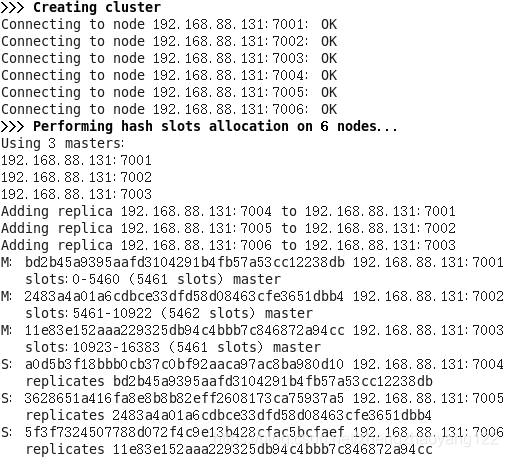
【6】使用 ruby 脚本搭建集群:进入 Redis 源码目录中的 src 目录,执行如下命令:需要更换 IP 地址
./redis-trib.rb create --replicas 1 192.168.88.131:7001 192.168.88.131:7002 192.168.88.131:7003 192.168.88.131:7004 192.168.88.131:7005 192.168.88.131:7006
出现如下情况时表示集群成功:如图所示,7001至7003为主机,7004至7006为备机:
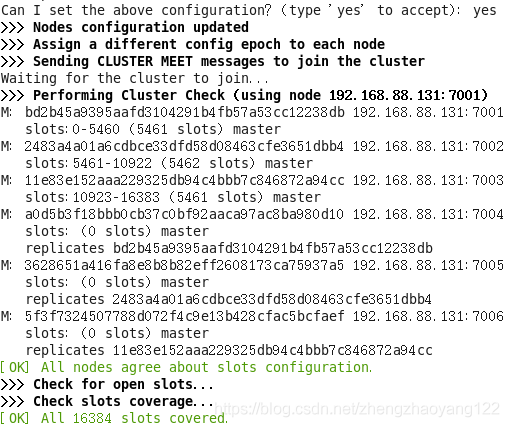
然后输入 yes 输入如下信息时,则表示配置成功:成功后你会发现其他节点都会有变化:
# 五、客户端连接 RedisCluster
进入可以连接 Redis 的客户端文件中,例如:我在 Windows 环境下使用的是 redis-cli.exe 可执行文件。通过运行如下命令:进入 Redis 集群(-h:连接的主机地址、-p:连接的端口、-c:表示集群环境,不写表示连接的单机。Redis只需连接一个节点即可进入集群环境,可以通过 quit 命令退出 Redis 客户端连接。通过客户端关闭Redis服务:./redis-cli -h 地址 -p 端口 shutdown)。

【跳转】:当客户端向一个错误的节点发出了指令后,该节点会发现指令的 key 所在的槽位并不归自己管理,这时它会向客户端发送一个特殊的跳转指令携带目标操作的节点地址,告诉客户端去连接这个节点以获取数据。
GET x
-MOVED 3999 127.0.0.1:8283
2
■ -MOVED: 前面有个减号,表示该指令是一个错误消息。客户端在收到 MOVED 指令后,要立即纠正本地的槽位映射表。后续所有key 将使用新的槽位映射;
■ 3999: key 对应的槽位编号;
■ 127.0.0.1:8283: 目标节点地址;
# 六、通过 SpringDataRedis 连接 Redis 集群:主要是两个配置文件
redis-cluster-config.properties(主要用于配置可变的服务器地址和端口)
#cluster configuration
redis.host1=192.168.88.131
redis.port1=7001

redis.host2=192.168.88.131
redis.port2=7002

redis.host3=192.168.88.131
redis.port3=7003

redis.host4=192.168.88.131
redis.port4=7004

redis.host5=192.168.88.131
redis.port5=7005

redis.host6=192.168.88.131
redis.port6=7006

redis.maxRedirects=3
redis.maxIdle=100
redis.maxTotal=600
2
3
4
5
6
7
8
9
10
11
12
13
14
15
16
17
18
19
20
21
22
applicationContext-redis-cluster.xml(从 properties 获取可变的参数作为属性传入集群类(redis-clusterConfiguration)中)
<?xml version="1.0" encoding="UTF-8"?>
<beans xmlns="http://www.springframework.org/schema/beans"
  xmlns:xsi="http://www.w3.org/2001/XMLSchema-instance" xmlns:p="http://www.springframework.org/schema/p"
  xmlns:context="http://www.springframework.org/schema/context"
  xsi:schemaLocation="http://www.springframework.org/schema/beans
            http://www.springframework.org/schema/beans/spring-beans.xsd
            http://www.springframework.org/schema/context
            http://www.springframework.org/schema/context/spring-context.xsd">
    <!-- 加载配置属性文件 -->
<context:property-placeholder ignore-unresolvable="true" location="classpath:properties/redis-cluster-config.properties" />
<bean id="redis-clusterConfiguration" class="org.springframework.data.redis.connection.redis-clusterConfiguration">
    <property name="maxRedirects" value="${redis.maxRedirects}"></property>
    <property name="clusterNodes">
    <set>
        <bean class="org.springframework.data.redis.connection.redis-clusterNode">
            <constructor-arg name="host" value="${redis.host1}"></constructor-arg>
        <constructor-arg name="port" value="${redis.port1}"></constructor-arg>
        </bean>
        <bean class="org.springframework.data.redis.connection.redis-clusterNode">
            <constructor-arg name="host" value="${redis.host2}"></constructor-arg>
        <constructor-arg name="port" value="${redis.port2}"></constructor-arg>
        </bean>
        <bean class="org.springframework.data.redis.connection.redis-clusterNode">
        <constructor-arg name="host" value="${redis.host3}"></constructor-arg>
        <constructor-arg name="port" value="${redis.port3}"></constructor-arg>
        </bean>
        <bean class="org.springframework.data.redis.connection.redis-clusterNode">
            <constructor-arg name="host" value="${redis.host4}"></constructor-arg>
            <constructor-arg name="port" value="${redis.port4}"></constructor-arg>
         </bean>
         <bean class="org.springframework.data.redis.connection.redis-clusterNode">
            <constructor-arg name="host" value="${redis.host5}"></constructor-arg>
            <constructor-arg name="port" value="${redis.port5}"></constructor-arg>
         </bean>
         <bean class="org.springframework.data.redis.connection.redis-clusterNode">
            <constructor-arg name="host" value="${redis.host6}"></constructor-arg>
        <constructor-arg name="port" value="${redis.port6}"></constructor-arg>
         </bean>
     </set>
     </property>
</bean>
<bean id="jedisPoolConfig"   class="redis.clients.jedis.JedisPoolConfig">
        <property name="maxIdle" value="${redis.maxIdle}" />
    <property name="maxTotal" value="${redis.maxTotal}" />
</bean>
<bean id="jedisConnectionFactory" class="org.springframework.data.redis.connection.jedis.JedisConnectionFactory"  >
        <constructor-arg ref="redis-clusterConfiguration" />
        <constructor-arg ref="jedisPoolConfig" />
</bean>
<bean id="redisTemplate" class="org.springframework.data.redis.core.RedisTemplate">
        <property name="connectionFactory" ref="jedisConnectionFactory" />
</bean>
</beans>
2
3
4
5
6
7
8
9
10
11
12
13
14
15
16
17
18
19
20
21
22
23
24
25
26
27
28
29
30
31
32
33
34
35
36
37
38
39
40
41
42
43
44
45
46
47
48
49
50
51
52
53
# 七、查询集群状态信息
通过cluster info可查询集群状态信息:
192.168.88.131:7001> cluster info
cluster_state:ok                        #集群状态
cluster_slots_assigned:16384            #被分配的槽位数
cluster_slots_ok:16384                  #正确分配的槽位数
cluster_slots_pfail:0
cluster_slots_fail:0
cluster_known_nodes:6                   #集群的节点个数
cluster_size:3
cluster_current_epoch:9
cluster_my_epoch:1
cluster_stats_messages_sent:9769
cluster_stats_messages_received:9740
2
3
4
5
6
7
8
9
10
11
12
# 八、添加主节点
【1】集群创建成功后,向集群创建添加 master 节点,准备一个 Redis 节点(7007 端口)并修改配置文件,随后将其启动成功,再新打开一个窗口,进入存放 redis-trib.rb 文件的目录下:执行如下命令:
[root@learnVM redis-cluster]# ./redis-trib.rb add-node 192.168.88.131:7007 192.168.88.131:7001
>>> Adding node 192.168.88.131:7007 to cluster 192.168.88.131:7001
Connecting to node 192.168.88.131:7001: OK
Connecting to node 192.168.88.131:7002: OK
Connecting to node 192.168.88.131:7005: OK
Connecting to node 192.168.88.131:7006: OK
Connecting to node 192.168.88.131:7004: OK
Connecting to node 192.168.88.131:7003: OK
>>> Performing Cluster Check (using node 192.168.88.131:7001)
M: bd2b45a9395aafd3104291b4fb57a53cc12238db 192.168.88.131:7001
   slots:0-5460 (5461 slots) master
   1 additional replica(s)
S: 2483a4a01a6cdbce33dfd58d08463cfe3651dbb4 192.168.88.131:7002
   slots: (0 slots) slave
   replicates 3628651a416fa8e8b8b82eff2608173ca75937a5
M: 3628651a416fa8e8b8b82eff2608173ca75937a5 192.168.88.131:7005
   slots:5461-10922 (5462 slots) master
   1 additional replica(s)
S: 5f3f7324507788d072f4c9e13b428cfac5bcfaef 192.168.88.131:7006
   slots: (0 slots) slave
   replicates 11e83e152aaa229325db94c4bbb7c846872a94cc
S: a0d5b3f18bbb0cb37c0bf92aaca97ac8ba980d10 192.168.88.131:7004
   slots: (0 slots) slave
   replicates bd2b45a9395aafd3104291b4fb57a53cc12238db
M: 11e83e152aaa229325db94c4bbb7c846872a94cc 192.168.88.131:7003
   slots:10923-16383 (5461 slots) master
   1 additional replica(s)
[OK] All nodes agree about slots configuration.
>>> Check for open slots...
>>> Check slots coverage...
[OK] All 16384 slots covered.
Connecting to node 192.168.88.131:7007: OK
>>> Send CLUSTER MEET to node 192.168.88.131:7007 to make it join the cluster.
[OK] New node added correctly.
2
3
4
5
6
7
8
9
10
11
12
13
14
15
16
17
18
19
20
21
22
23
24
25
26
27
28
29
30
31
32
33
34
【2】在客户端执行:cluster nodes 查看集群节点:会发现新添加的集群节点 7007(作为master却没有槽数<最后面的x-x>)
192.168.88.131:7001> cluster nodes
bd2b45a9395aafd3104291b4fb57a53cc12238db 192.168.88.131:7001 myself,master - 0 0 1 connected 0-5460
f4451c0e7d525303897e202cb504f7880b64e4fd 192.168.88.131:7007 master - 0 1562167495488 0 connected
2483a4a01a6cdbce33dfd58d08463cfe3651dbb4 192.168.88.131:7002 slave 3628651a416fa8e8b8b82eff2608173ca75937a5 0 1562167497511 10 connected
3628651a416fa8e8b8b82eff2608173ca75937a5 192.168.88.131:7005 master - 0 1562167497007 10 connected 5461-10922
5f3f7324507788d072f4c9e13b428cfac5bcfaef 192.168.88.131:7006 slave 11e83e152aaa229325db94c4bbb7c846872a94cc 0 1562167496501 8 connected
a0d5b3f18bbb0cb37c0bf92aaca97ac8ba980d10 192.168.88.131:7004 slave bd2b45a9395aafd3104291b4fb57a53cc12238db 0 1562167493969 4 connected
11e83e152aaa229325db94c4bbb7c846872a94cc 192.168.88.131:7003 master - 0 1562167494477 8 connected 10923-16383
2
3
4
5
6
7
8
【3】hash 槽从新分配:添加完主节点需要对主节点进行hash槽分配这样该主节才可以存储数据。redis 集群有16384个槽,集群中的每个master结点分配一些槽,通过查看集群结点可以看到槽占用情况。开始分配:执行如下命令
[root@learnVM redis-cluster]# ./redis-trib.rb reshard 192.168.88.131:7001
Connecting to node 192.168.88.131:7001: OK
Connecting to node 192.168.88.131:7007: OK
Connecting to node 192.168.88.131:7002: OK
Connecting to node 192.168.88.131:7005: OK
Connecting to node 192.168.88.131:7006: OK
Connecting to node 192.168.88.131:7004: OK
Connecting to node 192.168.88.131:7003: OK
>>> Performing Cluster Check (using node 192.168.88.131:7001)
M: bd2b45a9395aafd3104291b4fb57a53cc12238db 192.168.88.131:7001
   slots:0-5460 (5461 slots) master
   1 additional replica(s)
M: f4451c0e7d525303897e202cb504f7880b64e4fd 192.168.88.131:7007
   slots: (0 slots) master
   0 additional replica(s)
S: 2483a4a01a6cdbce33dfd58d08463cfe3651dbb4 192.168.88.131:7002
   slots: (0 slots) slave
   replicates 3628651a416fa8e8b8b82eff2608173ca75937a5
M: 3628651a416fa8e8b8b82eff2608173ca75937a5 192.168.88.131:7005
   slots:5461-10922 (5462 slots) master
   1 additional replica(s)
S: 5f3f7324507788d072f4c9e13b428cfac5bcfaef 192.168.88.131:7006
   slots: (0 slots) slave
   replicates 11e83e152aaa229325db94c4bbb7c846872a94cc
S: a0d5b3f18bbb0cb37c0bf92aaca97ac8ba980d10 192.168.88.131:7004
   slots: (0 slots) slave
   replicates bd2b45a9395aafd3104291b4fb57a53cc12238db
M: 11e83e152aaa229325db94c4bbb7c846872a94cc 192.168.88.131:7003
   slots:10923-16383 (5461 slots) master
   1 additional replica(s)
[OK] All nodes agree about slots configuration.
>>> Check for open slots...
>>> Check slots coverage...
[OK] All 16384 slots covered.
How many slots do you want to move (from 1 to 16384)?
2
3
4
5
6
7
8
9
10
11
12
13
14
15
16
17
18
19
20
21
22
23
24
25
26
27
28
29
30
31
32
33
34
35
☛ 出现上述的:How many slots do you want to move(是询问你需要分配的槽大小:我们就输入1000<输入1000表示要分配1000个槽>)
What is the receiving node ID? f4451c0e7d525303897e202cb504f7880b64e4fd
☛ 出现上述情况:询问需要分配槽的节点id:我们就输入7007的节点ID(就是刚才执行 cluster nodes 返回的第一行数据)
Please enter all the source node IDs.
  Type 'all' to use all the nodes as source nodes for the hash slots.
  Type 'done' once you entered all the source nodes IDs.
Source node #1:
2
3
4
☛ 输入源节点 id:槽将从源节点中拿,分配后的槽在源节点就不存在了。输入 all 将从所有源节点开始拿,done 取消分配。
......
    Moving slot 11254 from 11e83e152aaa229325db94c4bbb7c846872a94cc
    Moving slot 11255 from 11e83e152aaa229325db94c4bbb7c846872a94cc
Do you want to proceed with the proposed reshard plan (yes/no)? yes
2
3
4
☛ 输入 yes 开始移动槽到目标结点id:
Moving slot 11253 from 192.168.88.131:7003 to 192.168.88.131:7007:
Moving slot 11254 from 192.168.88.131:7003 to 192.168.88.131:7007:
Moving slot 11255 from 192.168.88.131:7003 to 192.168.88.131:7007:
[root@learnVM redis-cluster]#
2
3
4
【4】重新查看节点信息: 7007的槽(0-332 5461-5794 10923-11255)是来自其他三个master节点的部分槽。
192.168.88.131:7001> cluster nodes
bd2b45a9395aafd3104291b4fb57a53cc12238db 192.168.88.131:7001 myself,master - 0 0 1 connected 333-5460
f4451c0e7d525303897e202cb504f7880b64e4fd 192.168.88.131:7007 master - 0 1562169453293 11 connected 0-332 5461-5794 10923-11255
2483a4a01a6cdbce33dfd58d08463cfe3651dbb4 192.168.88.131:7002 slave 3628651a416fa8e8b8b82eff2608173ca75937a5 0 1562169456321 10 connected
3628651a416fa8e8b8b82eff2608173ca75937a5 192.168.88.131:7005 master - 0 1562169450269 10 connected 5795-10922
5f3f7324507788d072f4c9e13b428cfac5bcfaef 192.168.88.131:7006 slave 11e83e152aaa229325db94c4bbb7c846872a94cc 0 1562169449259 8 connected
a0d5b3f18bbb0cb37c0bf92aaca97ac8ba980d10 192.168.88.131:7004 slave bd2b45a9395aafd3104291b4fb57a53cc12238db 0 1562169454300 4 connected
11e83e152aaa229325db94c4bbb7c846872a94cc 192.168.88.131:7003 master - 0 1562169455309 8 connected 11256-16383
2
3
4
5
6
7
8
# 九、添加从节点
集群创建成功后,可以向集群中插入一个 slave 从节点(准备一个 7008 端口的 Redis并将其启动成功,我们将其配置为 7007 的从节点),打开新的窗口,进入存放 redis-trib.rb 文件的目录下,执行如下命令(格式为:./redis-trib.rb add-node --slave --master-id 主节点id 添加节点的ip和端口 集群中已存在节点ip和端口):其中主节点ID,通过 cluster nodes 查询获取。
[root@learnVM redis-cluster]# ./redis-trib.rb add-node --slave --master-id f4451c0e7d525303897e202cb504f7880b64e4fd 192.168.88.131:7008 192.168.88.131:7001
>>> Adding node 192.168.88.131:7008 to cluster 192.168.88.131:7001
Connecting to node 192.168.88.131:7001: OK
Connecting to node 192.168.88.131:7007: OK
Connecting to node 192.168.88.131:7002: OK
Connecting to node 192.168.88.131:7005: OK
Connecting to node 192.168.88.131:7006: OK
Connecting to node 192.168.88.131:7004: OK
Connecting to node 192.168.88.131:7003: OK
>>> Performing Cluster Check (using node 192.168.88.131:7001)
M: bd2b45a9395aafd3104291b4fb57a53cc12238db 192.168.88.131:7001
   slots:333-5460 (5128 slots) master
   1 additional replica(s)
M: f4451c0e7d525303897e202cb504f7880b64e4fd 192.168.88.131:7007
   slots:0-332,5461-5794,10923-11255 (1000 slots) master
   0 additional replica(s)
M: 2483a4a01a6cdbce33dfd58d08463cfe3651dbb4 192.168.88.131:7002
   slots:5795-10922 (5128 slots) master
   1 additional replica(s)
S: 3628651a416fa8e8b8b82eff2608173ca75937a5 192.168.88.131:7005
   slots: (0 slots) slave
   replicates 2483a4a01a6cdbce33dfd58d08463cfe3651dbb4
S: 5f3f7324507788d072f4c9e13b428cfac5bcfaef 192.168.88.131:7006
   slots: (0 slots) slave
   replicates 11e83e152aaa229325db94c4bbb7c846872a94cc
S: a0d5b3f18bbb0cb37c0bf92aaca97ac8ba980d10 192.168.88.131:7004
   slots: (0 slots) slave
   replicates bd2b45a9395aafd3104291b4fb57a53cc12238db
M: 11e83e152aaa229325db94c4bbb7c846872a94cc 192.168.88.131:7003
   slots:11256-16383 (5128 slots) master
   1 additional replica(s)
[OK] All nodes agree about slots configuration.
>>> Check for open slots...
>>> Check slots coverage...
[OK] All 16384 slots covered.
Connecting to node 192.168.88.131:7008: OK
>>> Send CLUSTER MEET to node 192.168.88.131:7008 to make it join the cluster.
Waiting for the cluster to join.
>>> Configure node as replica of 192.168.88.131:7007.
[OK] New node added correctly.
2
3
4
5
6
7
8
9
10
11
12
13
14
15
16
17
18
19
20
21
22
23
24
25
26
27
28
29
30
31
32
33
34
35
36
37
38
39
40
通过客户端程序查看集群节点信息:cluster nodes 得知 7008 为 7007 的 slave 节点
192.168.88.131:7001> cluster nodes
bd2b45a9395aafd3104291b4fb57a53cc12238db 192.168.88.131:7001 myself,master - 0 0 1 connected 333-5460
9d4b0154bad39acd862d651f0be5d3606e862862 192.168.88.131:7008 slave f4451c0e7d525303897e202cb504f7880b64e4fd 0 1562244812807 11 connected
f4451c0e7d525303897e202cb504f7880b64e4fd 192.168.88.131:7007 master - 0 1562244810282 11 connected 0-332 5461-5794 10923-11255
2483a4a01a6cdbce33dfd58d08463cfe3651dbb4 192.168.88.131:7002 master - 0 1562244813825 12 connected 5795-10922
3628651a416fa8e8b8b82eff2608173ca75937a5 192.168.88.131:7005 slave 2483a4a01a6cdbce33dfd58d08463cfe3651dbb4 0 1562244809775 12 connected
5f3f7324507788d072f4c9e13b428cfac5bcfaef 192.168.88.131:7006 slave 11e83e152aaa229325db94c4bbb7c846872a94cc 0 1562244808764 8 connected
a0d5b3f18bbb0cb37c0bf92aaca97ac8ba980d10 192.168.88.131:7004 slave bd2b45a9395aafd3104291b4fb57a53cc12238db 0 1562244810786 4 connected
11e83e152aaa229325db94c4bbb7c846872a94cc 192.168.88.131:7003 master - 0 1562244811799 8 connected 11256-16383
2
3
4
5
6
7
8
9
# 十、删除节点
【1】我们将刚添加的 7008 从节点进行删除,命令如下:删除后通过 cluster nodes 查看发现 7008 成功移除
[root@learnVM redis-cluster]# ./redis-trib.rb del-node 192.168.88.131:7008 9d4b0154bad39acd862d651f0be5d3606e862862
>>> Removing node 9d4b0154bad39acd862d651f0be5d3606e862862 from cluster 192.168.88.131:7008
Connecting to node 192.168.88.131:7008: OK
Connecting to node 192.168.88.131:7004: OK
Connecting to node 192.168.88.131:7003: OK
Connecting to node 192.168.88.131:7002: OK
Connecting to node 192.168.88.131:7005: OK
Connecting to node 192.168.88.131:7001: OK
Connecting to node 192.168.88.131:7006: OK
Connecting to node 192.168.88.131:7007: OK
>>> Sending CLUSTER FORGET messages to the cluster...
>>> SHUTDOWN the node.
2
3
4
5
6
7
8
9
10
11
12
【2】接着主节点 7007 会发现不能删除,因为其占有 hash 槽,需要将槽分配给其他节点,方能删除:
[root@learnVM redis-cluster]# ./redis-trib.rb del-node 192.168.88.131:7007 f4451c0e7d525303897e202cb504f7880b64e4fd
>>> Removing node f4451c0e7d525303897e202cb504f7880b64e4fd from cluster 192.168.88.131:7007
Connecting to node 192.168.88.131:7007: OK
Connecting to node 192.168.88.131:7006: OK
Connecting to node 192.168.88.131:7002: OK
Connecting to node 192.168.88.131:7003: OK
Connecting to node 192.168.88.131:7005: OK
Connecting to node 192.168.88.131:7001: OK
Connecting to node 192.168.88.131:7004: OK
[ERR] Node 192.168.88.131:7007 is not empty! Reshard data away and try again.
2
3
4
5
6
7
8
9
10
【3】将 7007 的槽分配给 7001(参考 八【3】 的槽重新分配:重点修改内容如下:)
(ps:通过任意节点连接上集群redis集群)
[root@learnVM redis-cluster]# ./redis-trib.rb reshard 192.168.88.131:7001
(ps:输入当时分配给7007的槽个数1000)
How many slots do you want to move (from 1 to 16384)? 1000
(ps:输入要分给的节点ID,这里我输的是7001的ID)
What is the receiving node ID? bd2b45a9395aafd3104291b4fb57a53cc12238db
(ps:这里输入槽的来源:输入7007的ID,之前输入的是all)
Source node #1:f4451c0e7d525303897e202cb504f7880b64e4fd
(ps:输入done表示可以开始迁移计划)
Source node #2:done
(ps:输入yes表示可以开始执行迁移计划)
Do you want to proceed with the proposed reshard plan (yes/no)? yes
(ps:可以通过 cluster nodes 查看7007的槽个数了)
2
3
4
5
6
7
8
9
10
11
12
13
【4】重新执行删除 7007 节点的命令:通过 cluster nodes 会发现 7007 节点以被删除
[root@learnVM redis-cluster]# ./redis-trib.rb del-node 192.168.88.131:7007 f4451c0e7d525303897e202cb504f7880b64e4fd
>>> Removing node f4451c0e7d525303897e202cb504f7880b64e4fd from cluster 192.168.88.131:7007
Connecting to node 192.168.88.131:7007: OK
Connecting to node 192.168.88.131:7006: OK
Connecting to node 192.168.88.131:7002: OK
Connecting to node 192.168.88.131:7003: OK
Connecting to node 192.168.88.131:7005: OK
Connecting to node 192.168.88.131:7001: OK
Connecting to node 192.168.88.131:7004: OK
>>> Sending CLUSTER FORGET messages to the cluster...
>>> SHUTDOWN the node.
2
3
4
5
6
7
8
9
10
11
# 十一、迁移
RedisCluster 提供了工具 redis-trib 可以让运维人员手动调整槽位的分配情况。Redis 数据迁移是槽,Reids 是一个一个槽进行迁移,当一个槽正在迁移时,这个槽就处于中间过渡状态。如下图:槽的源节点的状态为 migrating(迁移),在目标节点的状态为 importin(导入)表示数据正在从源节点流向目标节点。
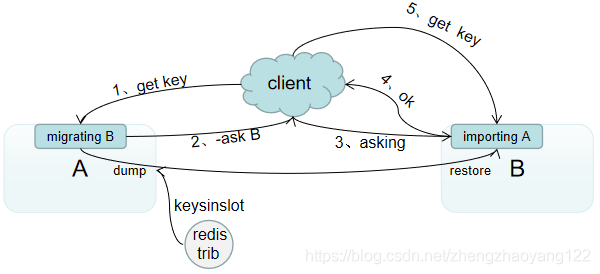
迁移工具 redis-trib 首先会在源节点和目标节点设置好中间过渡状态,然后一次性获取源节点槽位的所有 key 列表(keysinslot 指令,可以部分获取)再挨个 key 进行迁移。每个 key 的迁移过程是以源节点作为目标节点的“客户端”,源节点对当前的 key 执行 dump 指令得到序列化内容,然后通过“客户端”向目标节点发送 restore 指令携带序列化的内容作为参数,目标节点再进行反序列化就可以将内容恢复到目标节点的内存中,然后返回“客户端”OK,源节点“客户端”收到后再把当前节点的 key 删除掉就完成了单个 key 迁移的全过程。大致流程:从源节点获取内容—>存在目标节点—>从源节点删除内容。这里的迁移过程是同步的,在目标节点执行 restore 指令到源节点删除 key 之间,源节点的主线程会处于阻塞状态,直到 key 被成功删除。如果迁移过程中出现网络故障,整个槽迁移了一半,这时两个节点依旧处于中间过渡状态,待下次迁移工具重新连接上时,会提示用户继续进行迁移。
迁移过程中,如果每个 key 的内容都很小,migrate 指令会执行得很快,他就不会影响客户端的正常访问。如果 key 的内容很大,因为 migrate 指令时阻塞指令,会同时导致源节点和目标节点卡顿,影响集群的稳定性。所以在集群环境下,业务逻辑要尽可能避免产生很大的key。
迁移过程中,客户端访问流程的变化: 首先新旧两个节点对应的槽位都存在部分 key 数据。客户端先尝试访问旧节点。如果对应的数据还在旧节点里面,那么旧节点正常处理。那么对应的节点不在旧节点中,那么有两种可能,不存在或者在新节点中。此时旧节点会向客户端发送 -ASK targetNodeAddr 的重定向指令。客户端收到指令后,先去目标节点执行一个不带任何参数的 ASKING 指令,然后在目标节点再重新执行原先的操作指令。
为什么需要执行一个不带参数的 ASKING 指令:在迁移未完成之前,按理说这个槽位还是不归新节点管理的,如果这个时候向目标节点发送该槽位的指令,节点是不认的,它会向客户端返回一个 -MOVED 重定向指令告诉它去源节点执行。如此就会形成重定向循环。ASKING 指令的目标就是打开目标节点的选项,告诉它下一条指令不能不理,要当成自己的槽位来处理。从以上过程可以看出,迁移会影响服务效率的,同样的指令在正常情况下一个ttl 就能完成,而在迁移情况下需要3个ttl 才能搞定。
# 十二、容错
Redis Cluster 可以为每个主节点设置若干个从节点,当主节点发生故障时,集群会自动将其中某个从节点提升为主节点。如果某个主节点没有从节点,那么当它发生故障时,集群将完全处于不可用状态。不过 Redis 也提供了一个参数 cluster-require-full-converage 可以允许部分节点发生故障,其他节点还可以继续提供对外访问。
# 十三、网络抖动
网络抖动:突然间部分连接变得不可访问,然后又很快恢复正常。为解决这个问题,Redis Cluster 提供了一种选项 cluster-node-timeout,表示当某个节点持续 timeout的时间失联时,才可以认定该节点出现故障,需要进行主从切换。如果没有这个选项,网络抖动导致主从频繁切换。cluster-slave-validity-factor 配置系数,等于零时,主从切换是不会抗拒网络抖动的。如果这个系数大于1,他就成了主从切换的松弛系数。 目标节点的选项,告诉它下一条指令不能不理,要当成自己的槽位来处理。从以上过程可以看出,迁移会影响服务效率的,同样的指令在正常情况下一个ttl 就能完成,而在迁移情况下需要3个ttl 才能搞定。
# 十二、容错
Redis Cluster 可以为每个主节点设置若干个从节点,当主节点发生故障时,集群会自动将其中某个从节点提升为主节点。如果某个主节点没有从节点,那么当它发生故障时,集群将完全处于不可用状态。不过 Redis 也提供了一个参数 cluster-require-full-converage 可以允许部分节点发生故障,其他节点还可以继续提供对外访问。
# 十三、网络抖动
网络抖动:突然间部分连接变得不可访问,然后又很快恢复正常。为解决这个问题,Redis Cluster 提供了一种选项 cluster-node-timeout,表示当某个节点持续 timeout的时间失联时,才可以认定该节点出现故障,需要进行主从切换。如果没有这个选项,网络抖动导致主从频繁切换。cluster-slave-validity-factor 配置系数,等于零时,主从切换是不会抗拒网络抖动的。如果这个系数大于1,他就成了主从切换的松弛系数。
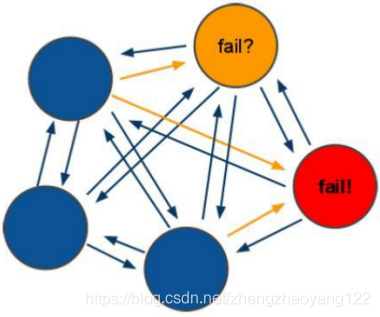
【PFail 与 Fail】:只有大多数节点都认定某个节点挂了,集群才认为该节点需要进行主从切换来容错。Redis 节点采用 Gossip 协议来广播自己的状态以及对整个集群的认知。比如一个节点发现某个节点失联了(PFail:Possibly Fail),它会将这条信息整个集群广播,其他节点就可以收到这个节点的失联信息。如果收到了某个节点失联的节点数量(PFail Count)已经达到了集群的大多数,就可以标记该失联节点为确定下线状态(Fail),然后向整个集群广播,强迫其他节点页接受该节点已经下线的事实,并立即对该失联节点进行主从切换。
← Redis 主从复制 Redis 持久化 →