如今,REST和微服务已经有了很大的发展势头。但是,REST规范中并没有提供一种规范来编写我们的对外REST接口API文档。每个人都在用自己的方式记录api文档,因此没有一种标准规范能够让我们很容易的理解和使用该接口。我们需要一个共同的规范和统一的工具来解决文档的难易理解文档的混乱格式。Swagger(在谷歌、IBM、微软等公司的支持下)做了一个公共的文档风格来填补上述问题。在本博客中,我们将会学习怎么使用Swagger的 Swagger2注解去生成REST API文档。
TIP
Swagger(现在是“开放 API计划”)是一种规范和框架,它使用一种人人都能理解的通用语言来描述REST API。还有其他一些可用的框架,比如RAML、求和等等,但是 Swagger是最受欢迎的。它提供了人类可读和机器可读的文档格式。它提供了JSON和UI支持。JSON可以用作机器可读的格式,而 Swagger-UI是用于可视化的,通过浏览api文档,人们很容易理解它。
# 一、添加 Swagger2 的 maven依赖
打开项目中的 pom.xml文件,添加以下两个 swagger依赖。springfox-swagger2 、springfox-swagger-ui。
<dependency>
       <groupId>io.springfox</groupId>
       <artifactId>springfox-swagger2</artifactId>
       <version>2.6.1</version>
</dependency>

<dependency>
       <groupId>io.springfox</groupId>
       <artifactId>springfox-swagger-ui</artifactId>
       <version>2.6.1</version>
</dependency>
2
3
4
5
6
7
8
9
10
11
实际上,Swagger的 API有两种类型,并在不同的工件中维护。今天我们将使用 springfox,因为这个版本可以很好地适应任何基于 spring的配置。我们还可以很容易地尝试其他配置,这应该提供相同的功能——配置中没有任何变化。
# 二、添加 Swagger2配置
使用 Java config的方式添加配置。为了帮助你理解这个配置,我在代码中写了相关的注释:
import org.springframework.context.annotation.Bean;
import org.springframework.context.annotation.Configuration;
import org.springframework.web.servlet.config.annotation.ResourceHandlerRegistry;
import org.springframework.web.servlet.config.annotation.WebMvcConfigurerAdapter;
import com.google.common.base.Predicates;
import springfox.documentation.builders.RequestHandlerSelectors;
import springfox.documentation.spi.DocumentationType;
import springfox.documentation.spring.web.plugins.Docket;
import springfox.documentation.swagger2.annotations.EnableSwagger2;

@Configuration
@EnableSwagger2
public class Swagger2UiConfiguration extends WebMvcConfigurerAdapter
{
    @Bean
    public Docket api() {
        // @formatter:off
        //将控制器注册到 swagger
        //还配置了Swagger 容器
        return new Docket(DocumentationType.SWAGGER_2).select()
                 .apiInfo(apiInfo())
                 .select()
                 .apis(RequestHandlerSelectors.any())
                 //扫描 controller所有包
                 .apis(Predicates.not(RequestHandlerSelectors.basePackage("org.springframework.boot")))
                 .paths(PathSelectors.any())
                 .paths(PathSelectors.ant("/swagger2-demo"))
                 .build();
        // @formatter:on
    }

    @Override
    public void addResourceHandlers(ResourceHandlerRegistry registry)
    {
        //为可视化文档启用swagger ui部件
        registry.addResourceHandler("swagger-ui.html").addResourceLocations("classpath:/META-INF/resources/");
        registry.addResourceHandler("/webjars/**").addResourceLocations("classpath:/META-INF/resources/webjars/");
    }
}
2
3
4
5
6
7
8
9
10
11
12
13
14
15
16
17
18
19
20
21
22
23
24
25
26
27
28
29
30
31
32
33
34
35
36
37
38
39
通过 api()方法返回 Docket,调用以下方法:
【1】apiInfo()方法中可以添加 api文档的基本信息(具体类型查看文档);
【2】select()方法返回 ApiSelectorBuilder实例,用于过滤哪些 api需要显示;
【3】apis()方法中填写项目中 Controller类存放的路径;
最后 build()建立 Docket。
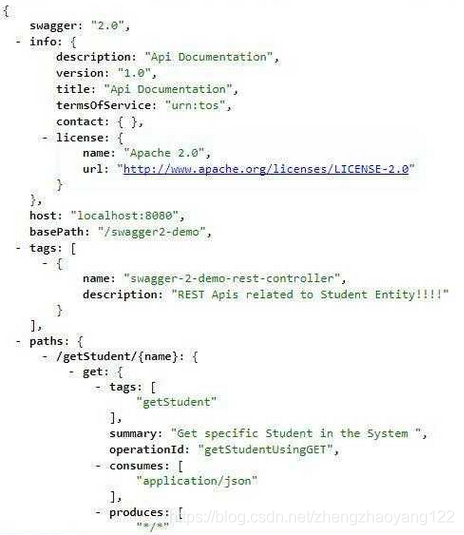
# 三、验证 Swagger2的 JSON格式文档
在application.yml中配置服务名为:swagger2-demo
server.contextPath=/swagger2-demo
maven构建并启动服务器。打开链接 (opens new window),会生成一个JSON格式的文档。这并不是那么容易理解,实际上Swagger已经提供该文档在其他第三方工具中使用,例如当今流行的 API管理工具,它提供了API网关、API缓存、API文档等功能。
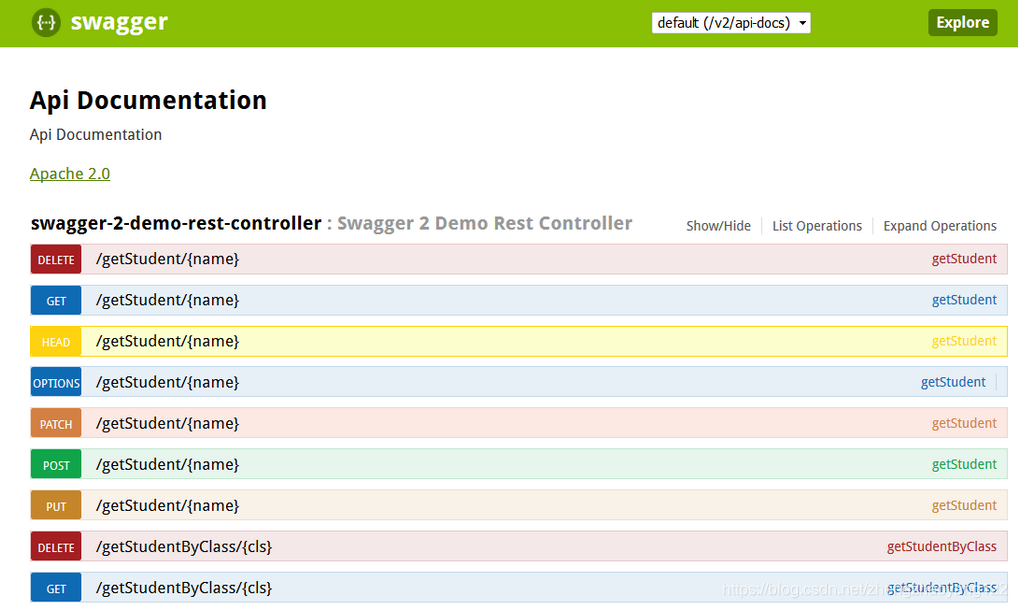
# 四、验证 Swagger2 UI文档
打开链接 (opens new window) 在浏览器中来查看Swagger UI文档;
# 五、Swagger2 注解的使用
默认生成的 API文档很好,但是它们缺乏详细的 API级别信息。Swagger提供了一些注释,可以将这些详细信息添加到 api中。如。@Api我们可以添加这个注解在 Controller上,去添加一个基本的 Controller说明。
@Api(value = "Swagger2DemoRestController", description = "REST APIs related to Student Entity!!!!")
@RestController
public class Swagger2DemoRestController {
    //...
}
2
3
4
5
@ApiOperation and @ApiResponses我们添加这个注解到任何 Controller的 rest方法上来给方法添加基本的描述。例如:
@ApiOperation(value = "Get list of Students in the System ", response = Iterable.class, tags = "getStudents")
@ApiResponses(value = {
            @ApiResponse(code = 200, message = "Success|OK"),
            @ApiResponse(code = 401, message = "not authorized!"),
            @ApiResponse(code = 403, message = "forbidden!!!"),
            @ApiResponse(code = 404, message = "not found!!!") })

@RequestMapping(value = "/getStudents")
public List<Student> getStudents() {
    return students;
}
2
3
4
5
6
7
8
9
10
11
在这里,我们可以向方法中添加标签,来在 swagger-ui中添加一些分组。@ApiModelProperty这个注解用来在数据模型对象中的属性上添加一些描述,会在 Swagger UI中展示模型的属性。例如:
@ApiModelProperty(notes = "Name of the Student",name="name",required=true,value="test name")
private String name;
2
Controller 和 Model 类添加了swagger2注解之后,代码清单:Swagger2DemoRestController.java
import java.util.ArrayList;
import java.util.List;
import java.util.stream.Collectors;
import org.springframework.web.bind.annotation.PathVariable;
import org.springframework.web.bind.annotation.RequestMapping;
import org.springframework.web.bind.annotation.RestController;
import com.example.springbootswagger2.model.Student;
import io.swagger.annotations.Api;
import io.swagger.annotations.ApiOperation;
import io.swagger.annotations.ApiResponse;
import io.swagger.annotations.ApiResponses;
@Api(value = "Swagger2DemoRestController", description = "REST Apis related to Student Entity!!!!")
@RestController
public class Swagger2DemoRestController {
List<Student> students = new ArrayList<Student>();
{
students.add(new Student("Sajal", "IV", "India"));
students.add(new Student("Lokesh", "V", "India"));
students.add(new Student("Kajal", "III", "USA"));
students.add(new Student("Sukesh", "VI", "USA"));
}
@ApiOperation(value = "Get list of Students in the System ", response = Iterable.class, tags = "getStudents")
@ApiResponses(value = {
@ApiResponse(code = 200, message = "Suceess|OK"),
@ApiResponse(code = 401, message = "not authorized!"),
@ApiResponse(code = 403, message = "forbidden!!!"),
@ApiResponse(code = 404, message = "not found!!!") })
@RequestMapping(value = "/getStudents")
public List<Student> getStudents() {
return students;
}
@ApiOperation(value = "Get specific Student in the System ", response = Student.class, tags = "getStudent")
@RequestMapping(value = "/getStudent/{name}")
public Student getStudent(@PathVariable(value = "name") String name) {
return students.stream().filter(x -> x.getName().equalsIgnoreCase(name)).collect(Collectors.toList()).get(0);
}
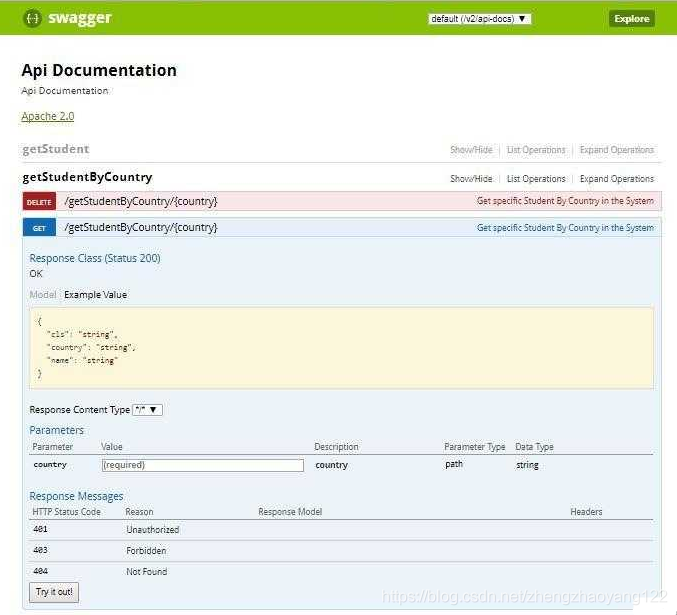
@ApiOperation(value = "Get specific Student By Country in the System ", response = Student.class, tags = "getStudentByCountry")
@RequestMapping(value = "/getStudentByCountry/{country}")
public List<Student> getStudentByCountry(@PathVariable(value = "country") String country) {
System.out.println("Searching Student in country : " + country);
List<Student> studentsByCountry = students.stream().filter(x -> x.getCountry().equalsIgnoreCase(country))
.collect(Collectors.toList());
System.out.println(studentsByCountry);
return studentsByCountry;
}
// @ApiOperation(value = "Get specific Student By Class in the System ",response = Student.class,tags="getStudentByClass")
@RequestMapping(value = "/getStudentByClass/{cls}")
public List<Student> getStudentByClass(@PathVariable(value = "cls") String cls) {
return students.stream().filter(x -> x.getCls().equalsIgnoreCase(cls)).collect(Collectors.toList());
}
}
2
3
4
5
6
7
8
9
10
11
12
13
14
15
16
17
18
19
20
21
22
23
24
25
26
27
28
29
30
31
32
33
34
35
36
37
38
39
40
41
42
43
44
45
46
47
48
49
50
51
52
53
54
55
56
57
58
Student.java 实体类
import io.swagger.annotations.ApiModelProperty;

public class Student
{
    @ApiModelProperty(notes = "Name of the Student",name="name",required=true,value="test name")
    private String name;

    @ApiModelProperty(notes = "Class of the Student",name="cls",required=true,value="test class")
    private String cls;

    @ApiModelProperty(notes = "Country of the Student",name="country",required=true,value="test country")
    private String country;

    public Student(String name, String cls, String country) {
        super();
        this.name = name;
        this.cls = cls;
        this.country = country;
    }

    public String getName() {
        return name;
    }

    public String getCls() {
        return cls;
    }

    public String getCountry() {
        return country;
    }

    @Override
    public String toString() {
        return "Student [name=" + name + ", cls=" + cls + ", country=" + country + "]";
    }
}
2
3
4
5
6
7
8
9
10
11
12
13
14
15
16
17
18
19
20
21
22
23
24
25
26
27
28
29
30
31
32
33
34
35
36
37
# 六、swagger-ui 展示
现在,当我们的 REST api得到适当的注释时,让我们看看最终的输出。打开http://localhost:8080/swagger2-demo/swagger-ui。在浏览器中查看 Swagger ui文档。